Building Envelope Research
Introduction
Heating and cooling
account for 50 to 70% of the energy used in the
average American home. Inadequate insulation and
air leakage are leading causes of energy waste
in most homes. Insulation:
This fact sheet will help you to understand how insulation works, what different types of insulation are available, and how much insulation makes sense for your climate. There are many other things you can do to conserve energy in your home as well. The Department of Energy offers many web sites to help you save energy by sealing air leaks, selecting more energy-efficient appliances, etc.
- saves money and our nation's limited energy resources
- makes your house more comfortable by helping to maintain a uniform temperature throughout the house, and
- makes walls, ceilings, and floors warmer in the winter and cooler in the summer
This fact sheet will help you to understand how insulation works, what different types of insulation are available, and how much insulation makes sense for your climate. There are many other things you can do to conserve energy in your home as well. The Department of Energy offers many web sites to help you save energy by sealing air leaks, selecting more energy-efficient appliances, etc.
How Insulation Works
Heat flows naturally from a warmer to a cooler space. In winter, the heat moves directly from all heated living spaces to the outdoors and to adjacent unheated attics, garages, and basements - wherever there is a difference in temperature. During the summer, heat moves from outdoors to the house interior. To maintain comfort, the heat lost in winter must be replaced by your heating system and the heat gained in summer must be removed by your air conditioner. Insulating ceilings, walls, and floors decreases the heating or cooling needed by providing an effective resistance to the flow of heat.
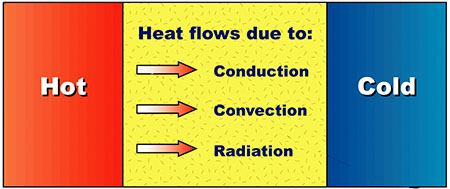 Batts, blankets, loose fill, and low-density foams all work by limiting air movement. (These products may be more familiarly called fiberglass, cellulose, polyicynene, and expanded polystyrene.) The still air is an effective insulator because it eliminates convection and has low conduction. Some foams, such as polyisocyanurate, polyurethane, and extruded polystyrene, are filled with special gases that provide additional resistance to heat flow.
Reflective insulation works by reducing the amount of energy that travels in the form of radiation. Some forms of reflective insulation also divide a space up into small regions to reduce air movement, or convection, but not to the same extent as batts, blankets, loose-fill, and foam.
Batts, blankets, loose fill, and low-density foams all work by limiting air movement. (These products may be more familiarly called fiberglass, cellulose, polyicynene, and expanded polystyrene.) The still air is an effective insulator because it eliminates convection and has low conduction. Some foams, such as polyisocyanurate, polyurethane, and extruded polystyrene, are filled with special gases that provide additional resistance to heat flow.Reflective insulation works by reducing the amount of energy that travels in the form of radiation. Some forms of reflective insulation also divide a space up into small regions to reduce air movement, or convection, but not to the same extent as batts, blankets, loose-fill, and foam.
Which Kind Of Insulation Is Best?
Based on our email, this is one of the most popular questions homeowners ask before buying insulation. The answer is that the 'best' type of insulation depends on:
Whenever you compare insulation products, it is critical that you base your comparison on equal R-values.
- how much insulation is needed,
- the accessibility of the insulation location,
- the space available for the insulation,
- local availability and price of insulation, and
- other considerations unique to each purchaser.
What Is an R-Value?
Insulation is rated in terms of thermal resistance, called R-value, which indicates the resistance to heat flow. The higher the R-value, the greater the insulating effectiveness. The R-value of thermal insulation depends on the type of material, its thickness, and its density. In calculating the R-value of a multi-layered installation, the R-values of the individual layers are added.
The effectiveness of an insulated ceiling, wall or floor depends on how and where the insulation is installed.
- Insulation which is compressed will not give you its full rated R-value. This can happen if you add denser insulation on top of lighter insulation in an attic. It also happens if you place batts rated for one thickness into a thinner cavity, such as placing R-19 insulation rated for 6 1/4 inches into a 5 1/2 inch wall cavity.
- Insulation placed between joists, rafters, and studs does not retard heat flow through those joists or studs. This heat flow is called thermal bridging. So, the overall R-value of a wall or ceiling will be somewhat different from the R-value of the insulation itself. That is why it is important that attic insulation cover the tops of the joists and that is also why we often recommend the use of insulative sheathing on walls. The short-circuiting through metal framing is much greater than that through wood-framed walls; sometimes the insulated metal wall's overall R-value can be as low as half the insulation's R-value.
Reading the Label
No matter what kind of insulation you buy, check the information on the product label to make sure that the product is suitable for the intended application.
To protect consumers, the Federal Trade Commission has very clear rules about the R-value label that must be placed on all residential insulation products, whether they are installed by professionals, or whether they are purchased at a local supply store. These labels include a clearly stated R-value and information about health, safety, and fire-hazard issues.
Take time to read the label BEFORE installing the insulation. Insist that any contractor installing insulation provide the product labels from EACH package (which will also tell you how many packages were used). Many special products have been developed to give higher R-values with less thickness. On the other hand, some materials require a greater initial thickness to offset eventual settling or to ensure that you get the rated R-value under a range of temperature conditions.
Insulation Product Types
Some types of insulation require professional installation, and others you can install yourself. You should consider the several forms of insulation available, their R-values, and the thickness needed. The type of insulation you use will be determined by the nature of the spaces in the house that you plan to insulate.
For example, since you cannot conveniently "pour" insulation into an overhead space, blankets, spray-foam, board products, or reflective systems are used between the joists of an unfinished basement ceiling. The most economical way to fill closed cavities in finished walls is with blown-in insulation applied with pneumatic equipment or with sprayed-in-place foam insulation.
For example, since you cannot conveniently "pour" insulation into an overhead space, blankets, spray-foam, board products, or reflective systems are used between the joists of an unfinished basement ceiling. The most economical way to fill closed cavities in finished walls is with blown-in insulation applied with pneumatic equipment or with sprayed-in-place foam insulation.
The different forms of insulation can be used together. For example, you can add batt or roll insulation over loose-fill insulation, or vice-versa. Usually, material of higher density (weight per unit volume) should not be placed on top of lower density insulation that is easily compressed. Doing so will reduce the thickness of the material underneath and thereby lower its R-value.
There is one exception to this general rule: When attic temperatures drop below 0°F, some low-density, fiberglass, loose-fill insulation installations may allow air to circulate between the top of your ceiling and the attic, decreasing the effectiveness of the insulation. You can eliminate this air circulation by covering the low-density, loose-fill insulation with a blanket insulation product or with a higher density loose-fill insulation.
There is one exception to this general rule: When attic temperatures drop below 0°F, some low-density, fiberglass, loose-fill insulation installations may allow air to circulate between the top of your ceiling and the attic, decreasing the effectiveness of the insulation. You can eliminate this air circulation by covering the low-density, loose-fill insulation with a blanket insulation product or with a higher density loose-fill insulation.
 Blankets, in the form of batts or rolls, are flexible products made from mineral fibers, including fiberglass or rock wool. They are available in widths suited to standard
spacing's of wall studs and attic or floor joists.
Blankets, in the form of batts or rolls, are flexible products made from mineral fibers, including fiberglass or rock wool. They are available in widths suited to standard
spacing's of wall studs and attic or floor joists.
They must be hand-cut and trimmed to fit wherever the joist spacing is non-standard (such as near windows, doors, or corners), or where there are obstructions in the walls (such as wires, electrical outlet boxes, or pipes).
Batts can be installed by homeowners or professionals. They are available with or without vapor-retarder facings. Batts with a special flame-resistant facing are available in various widths for basement walls where the insulation will be left exposed.
Blown-in loose-fill insulation includes cellulose, fiberglass, or rock wool in the form of loose fibers or fiber pellets that are blown using pneumatic equipment, usually by professional installers.
This form of insulation can be used in wall cavities. It is also appropriate for unfinished attic floors, for irregularly shaped areas, and for filling in around obstructions.
 In the open wall cavities of a new house, cellulose and fiberglass fibers can also be sprayed after mixing the fibers with an adhesive or foam to make them resistant to settling.

Foam insulation can be applied by a professional using special equipment to meter, mix, and spray the foam into place. Polyicynene is an open-celled foam. Polyisocyanurate and polyurethane are closed-cell foams.
In general, open-celled foam allows water vapor to move through the material more easily than closed-cell foam. However, open-celled foams usually have a lower R-value for a given thickness compared to closed-cell foams. So, some of the closed-cell foams are able to provide a greater R-value where space is limited.
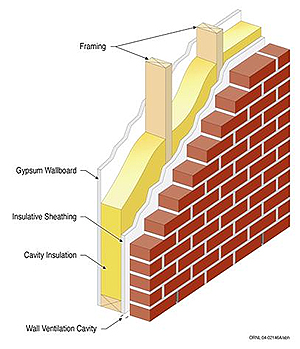
Rigid insulation is made from fibrous materials or plastic foams and is produced in board-like forms and molded pipe coverings.
These provide full coverage with few heat loss paths and are often able to provide a greater R-value where space is limited. Such boards may be faced with a reflective foil that reduces heat flow when next to an air space.
Rigid insulation is often used for foundations and as an insulative wall sheathing.
Reflective insulation systems are fabricated from aluminum foils with a variety of backings such as Kraft paper, plastic film, polyethylene bubbles, or cardboard. The resistance to heat flow depends on the heat flow direction, and this type of insulation is most effective in reducing downward heat flow. Reflective systems are typically located between roof rafters, floor joists, or wall studs. If a single reflective surface is used alone and faces an open space, such as an attic, it is called a radiant barrier.
Radiant barriers are installed in buildings to reduce summer heat gain and winter heat loss. In new buildings, you can select foil-faced wood products for your roof sheathing (installed with the foil facing down into the attic) or other locations to provide the radiant barrier as an integral part of the structure. For existing buildings, the radiant barrier is typically fastened across the bottom of joists, as shown in this drawing. All radiant barriers must have a low emittance (0.1 or less) and high reflectance (0.9 or more).
Insulating a New House (Do It Right the First Time)
If you are buying or building a new house, make sure that energy-saving features are included. The Federal Trade Commission (FTC) home insulation rule requires the seller of a new home to provide information on the type, thickness, and R-value of the insulation that will be installed in each part of the house in every sales contract.
Many state or local building codes include minimum requirements for home insulation. Be sure that your new home or home addition meets these building codes. You may wish to install insulation beyond the minimum specified in such codes, especially if those minimum levels are below those recommended here.
Also, Energy-Efficient Mortgages are available through both government-insured and conventional loan programs. These mortgages recognize that the homeowner's energy payments will be less for a more energy-efficient home, and therefore enable a buyer to borrow a larger sum to cover the up-front costs of improving the house's energy efficiency.
To keep initial selling prices competitive, many home builders offer standard (not optimal) levels of insulation, although additional insulation would be a good investment for the buyer. Builders participating in the Energy Star Program use third-party inspectors to not only ensure that the correct amount of insulation has been used, but also to ensure that it has been installed correctly.
Now is also the time to make your home air tight. Special products and techniques are available to eliminate air leaks between the walls and floor and between the walls and ceiling. Encourage your builder to make all clearances around doors and windows as tight as possible and to properly caulk and seal all such joints.
Where and How Much?
Figure 1 shows which building spaces should be insulated. Discuss the house plans with your builder, and make sure each of these spaces is properly insulated to the R-values recommended here. Remember to buy the insulation based on this R-value, and to check the product label to determine the insulation's proper thickness, especially if you plan to install it in a confined space, such as in wall cavities and cathedral ceilings.
Figure 2 shows the Department of Energy's climate zones, along with a short summary of our insulation recommendations for new houses. These recommendations are based on comparing your future energy savings to the current cost of installing insulation. A range is shown for many locations for these reasons:
Figure 2 shows the Department of Energy's climate zones, along with a short summary of our insulation recommendations for new houses. These recommendations are based on comparing your future energy savings to the current cost of installing insulation. A range is shown for many locations for these reasons:
- Energy costs vary greatly over each zone.
- Installed insulation costs vary greatly over each zone.
- Heating and cooling equipment efficiency varies from house to house.
- Our best estimate of future energy costs may not be exactly correct.
So, how should you decide how much insulation to install?
The future energy savings, of course, depends upon how much energy costs in the future. Our best estimate is that fuel costs will rise at approximately the same rate as general inflation. If you think that fuel costs will increase more than that, you should install the greater amount of insulation shown. Looking at the map, if you think the energy costs in your area are greater than energy costs for other locations in same climate zone, you should install the greater amount of insulation.
We can also give you better guidance for your specific location and recommendations for other insulation locations in your home. The ZIP-Code calculator will actually let you enter your own insulation prices, energy costs, and heating and cooling system efficiencies. However, some personal computer security systems won't allow Java programs to run properly. The recommended R-values table can be helpful in those cases, because it will provide recommendations based on insulation and energy costs for your local area.
Both insulative sheathing and cavity insulation are specified for walls because it is important to use them together as a system. Any combination of sheathing and cavity insulation shown in Figure 2 will give you a similar life-cycle savings.
The band joists, or outside edges of the floor frames, should be insulated while the house is under construction. For most of the country, you should try to install R-30 in this location. If you live in Climate Zone 1, R-19 is adequate. More detailed drawings and insulation techniques for the band joist are shown in the Wall Insulation Technology Fact Sheet.
 Foundation insulation options for new construction are broader than for existing homes. The builder may, for example, choose to insulate the exterior of a basement or crawlspace wall. You should discuss termite inspection and control options with your builder when choosing your foundation insulation method.
Special sill plate (the joint between the top of the foundation and the bottom of the house frame) mineral fiber sealing products are designed to reduce air leaks if installed during the initial house construction.
All flammable insulations or insulation facings must be covered or otherwise protected to meet fire codes. More information is given in the Basement Insulation Technology Fact Sheet.
If water lines and the ducts of your heating or air-conditioning system run through unheated or uncooled spaces, such as attic or crawlspaces, then the water lines and the ducts should be insulated. Make sure your contractor checks the ductwork for air leaks before installing the duct insulation. The contractor should then wrap the ducts with duct wrap insulation of R-6 with a vapor retarder facing on the outer side. All joints where sections of insulation meet should have overlapped facings and be tightly sealed with fiber glass tape; but avoid compressing the insulation, thus reducing its thickness and R-value.
Return air ducts are more likely to be located inside the heated portion of the house where they don't need to be insulated, but they should still be sealed off from air passageways that connect to unheated areas. Drywall- to-ductwork connections should be inspected because they are often poor (or nonexistent) and lead to unwanted air flows through wall cavities.
Air Sealing
Air sealing is important, not only because drafts are uncomfortable, but also because air leaks carry both moisture and energy, usually in the direction you don't want. For example, air leaks can carry hot humid outdoor air into your house in the summer, or can carry warm moist air from a bathroom into the attic in the winter.
Most homeowners are aware that air leaks into and out of their houses through small openings around doors and window frames and through fireplaces and chimneys. Air also enters the living space from other unheated parts of the house, such as attics, basements, or crawlspaces. The air travels through:
The following fact sheet will help you stop these air leaks:
When natural ventilation has been sharply reduced, as in a more energy-efficient house, it may be necessary to provide fresh air ventilation to avoid build-up of stale air and indoor air pollutants. Special air-to-air heat exchangers, or heat-recovery ventilators, are available for this purpose. It is also possible to incorporate a supply of fresh outside air into your heating and cooling system. This arrangement can be used to create a slightly higher pressure inside your home, which will prevent uncontrolled outside air infiltration into your home. For more details on this arrangement, see "Integration with forced-air heating and air-conditioning systems" in the
Whole-House Ventilation Systems Technology Fact Sheet.
Most homeowners are aware that air leaks into and out of their houses through small openings around doors and window frames and through fireplaces and chimneys. Air also enters the living space from other unheated parts of the house, such as attics, basements, or crawlspaces. The air travels through:
- any openings or cracks where two walls meet, where the wall meets the ceiling, or near interior door frames;
- gaps around electrical outlets, switch boxes, and recessed fixtures;
- gaps behind recessed cabinets, and furred or false ceilings such as kitchen or bathroom soffits;
- gaps around attic access hatches and pull-down stairs;
- behind bath tubs and shower stall units;
- through floor cavities of finished attics adjacent to unconditioned attic spaces;
- utility chaseways for ducts, etc., and
- plumbing and electrical wiring penetrations.
The following fact sheet will help you stop these air leaks:
When natural ventilation has been sharply reduced, as in a more energy-efficient house, it may be necessary to provide fresh air ventilation to avoid build-up of stale air and indoor air pollutants. Special air-to-air heat exchangers, or heat-recovery ventilators, are available for this purpose. It is also possible to incorporate a supply of fresh outside air into your heating and cooling system. This arrangement can be used to create a slightly higher pressure inside your home, which will prevent uncontrolled outside air infiltration into your home. For more details on this arrangement, see "Integration with forced-air heating and air-conditioning systems" in the
Whole-House Ventilation Systems Technology Fact Sheet.
Moisture Control and Ventilation
The future energy savings, of course, depends upon how much energy costs in the future. Our best estimate is that fuel costs will rise at approximately the same rate as general inflation. If you think that fuel costs will increase more than that, you should install the greater amount of insulation shown. Looking at the map, if you think the energy costs in your area are greater than energy costs for other locations in same climate zone, you should install the greater amount of insulation.
We talk about moisture control in an insulation fact sheet because wet insulation doesn't work well. Also, insulation is an important part of your building envelope system, and all parts of that system must work together to keep moisture from causing damage to the structure or being health hazards to the occupants. For example, mold and mildew grow in moist areas, causing allergic reactions and damaging buildings.
Moisture can enter your home during the construction process. The building materials can get wet during construction due to rain, dew, or by lying on the damp ground. Concrete walls and foundations release water steadily as they continue to cure during the first year after a home is built. During the house's first winter, this construction moisture may be released into the building at a rate of more than two gallons per day, and during the second winter at a slower rate of about one gallon per day. You may need to use dehumidifiers during this initial time period.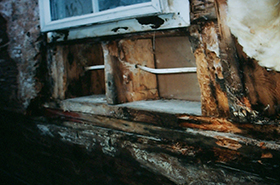
When Is Moisture a Problem?
Rain water can leak into your wall cavities if the windows are not properly flashed during installation. Also, when moist air touches a cold surface, some of the moisture may leave the air and condense, or become liquid.
If moisture condenses inside a wall, or in your attic, you will not be able to see the water, but it can cause a number of problems.
Four Things You Can Do to Avoid Moisture Problems:
1. Control liquid water.
Rain coming through a wall, especially a basement or crawlspace wall, may be less apparent than a roof leak, especially if it is a relatively small leak and the water remains inside the wall cavity. Stop all rain-water paths into your home by:
Rain coming through a wall, especially a basement or crawlspace wall, may be less apparent than a roof leak, especially if it is a relatively small leak and the water remains inside the wall cavity. Stop all rain-water paths into your home by:
- Use a Weather-Resistive Barrier.
- Caulk around all your windows and doors.
- Direct all water coming off your roof away from your house by sloping the soil around your house so that water flows away from your house.
- Use wide overhangs to keep the rain away from your walls and windows.
- Use large gutters and gutter guards to help keep rain from dripping onto the ground near the house.
Be sure that the condensate from your air conditioner is properly drained away from your house. You should also be careful that watering systems for your lawn or flower beds do not spray water on the side of your house or saturate the ground near the house. It is also a good idea to check the caulking around your tub or shower to make sure that water is not leaking into your walls or floors.
2. Ventilate.
You need to ventilate your home because you and your family generate moisture when you cook, shower, do laundry, and even when you breathe. More than 99% of the water used to water plants eventually enters the air.
If you use an unvented natural gas, propane, or kerosene space heater, all the products of combustion, including water vapor, are exhausted directly into your living space. This water vapor can add up to 5 to 15 gallons of water per day to the air inside your home. If your clothes dryer is not vented to the outside, or if the outdoor vent is closed off or clogged, all that moisture will enter your living space.
Just by breathing and perspiring, a typical family adds about 3 gallons of water per day to their indoor air. You especially need to vent your kitchen and bathrooms. Be sure that these vents go directly outside, and not to your attic, where the moisture can cause problems. Remember that a vent does not work unless you turn it on; so select quieter models that you are more likely to use. If your attic is ventilated, it is important that you never cover or block attic vents with insulation.
Take care to prevent loose-fill insulation from clogging attic vents by using baffles or rafter vents. These baffles also serve to keep the outside air from penetrating into the insulation. When you think about venting to remove moisture, you should also think about where the replacement air will come from, and how it will get into your house. For more information about controlled ventilation, see the
Whole-House Ventilation Systems Technology Fact Sheet.
3. Stop Air Leaks.
It is very important to seal up all air-leakage paths between your living spaces and other parts of your building structure. Measurements have shown that air leaking into walls and attics carries significant amounts of moisture. Remember that if any air is leaking through electrical outlets or around plumbing connections into your wall cavities, moisture is carried along the same path.
The same holds true for air moving through any leaks between your home and the attic, crawlspace, or garage. Even very small leaks in duct work can carry large amounts of moisture, because the airflow in your ducts is much greater than other airflows in your home. This is especially a problem if your ducts travel through a crawlspace or attic, so be sure to seal these ducts properly (and keep them sealed!).
Return ducts are even more likely to be leaky, because they often involve joints between drywall and ductwork that may be poorly sealed, or even not sealed at all.
4. Plan a moisture escape path.
Typical attic ventilation arrangements are one example of a planned escape path for moisture that has traveled from your home's interior into the attic space. Cold air almost always contains less water than hot air, so diffusion usually carries moisture from a warm place to a cold place.
You can let moisture escape from a wall cavity to the dry outdoors during the winter, or to the dry indoors during the summer, by avoiding the use of vinyl wall coverings or low-perm paint. You can also use a dehumidifier to reduce moisture levels in your home, but it will increase your energy use and you must be sure to keep it clean to avoid mold growth.
If you use a humidifier for comfort during the winter months, be sure that there are no closed-off rooms where the humidity level is too high.
Should you use vapor retarders?
Moisture can travel from the ground through the foundation and up into your walls, and through slab floors into your home. So your builder should always include a vapor retarder between the foundation and the walls. Should you include a vapor retarder in your wall? If so, where? If the outside air is colder and drier than the inside of a home, then moisture from inside the warm house will try to diffuse through the walls and ceiling toward the cold, dry outside air.
If the outside air is hot and humid, then moisture from outside will try to diffuse through the walls toward the dry, air-conditioned inside air. We used to tell people to install vapor retarders to try and stop this moisture diffusion. But we have learned that if moisture moves both ways for significant parts of the year, you're better off not using a vapor retarder in the walls at all.
Installation Issues
Your builder will most likely hire a subcontractor to install the insulation in your new home. However, it is a good idea to educate yourself about proper installation methods because an improper installation can reduce your energy savings.
Attics
In some houses, it is easier to get complete coverage of the attic floor with blown-in loose-fill insulation. Loose-fill insulation must be prevented from shifting into vents or from contacting heat-producing equipment (such as recessed lighting fixtures) by using baffles or retainers.
If batts or rolls are used, the first layer should be fit between the joists. The second layer should be placed perpendicular to the first because that will help to cover the tops of the joists themselves and reduce thermal bridging through the frame. Also, be sure to insulate the trap or access door. Although the area of the door is small, an uninsulated attic door will reduce energy savings substantially.
To be effective, Reflective Systems must be installed according to the manufacturer's instructions.
Radiant barriers may be installed in attics in several configurations. The radiant barrier is most often attached near the roof, to the bottom surface of the attic truss chords or to the rafter framing. A radiant barrier should never be placed on top of your insulation or on the attic floor because it will soon be covered with dust and will not work. A separate DOE fact sheet is available for radiant barriers to show which parts of the country are most likely to benefit from this type of system.
Walls
When batt insulation is installed, it is fit between the wood frame studs, according to the manufacturer's instructions. The batts must be carefully cut to fit around obstructions, such as window frames, pipes, wires, and electrical boxes with no gaps.
When batt insulation is installed, it is fit between the wood frame studs, according to the manufacturer's instructions. The batts must be carefully cut to fit around obstructions, such as window frames, pipes, wires, and electrical boxes with no gaps.
- Don't compress the insulation to fit behind pipes or wires. Instead cut to the middle of the batt's thickness so you have one flap under the pipe or wire and the other flap over the pipe or wire.
- One common mistake is to leave narrow places between close-spaced wall studs uninsulated. Even though these spaces may look like a very small part of the wall, small uninsulated areas can greatly reduce the insulation performance of the whole wall. Strips of insulation should be cut off and stuffed into such tight spaces by hand.
- The kraft paper or foil vapor retarder facings on many blanket insulation products must be covered with gypsum or interior paneling because of fire considerations.
Blown-in cellulose or spray foam can be used to fill wall cavities. Both of these products can do a good job of filling in the space around wires and other obstructions and in filling any oddly-shaped areas.
For cellulose, some form of netting is used to hold the cellulose in place until the drywall is installed. For spray-foam, it is important that the application be finished off neatly to avoid problems with the drywall installation.
Masonry walls should be insulated on the exterior surface.
For cellulose, some form of netting is used to hold the cellulose in place until the drywall is installed. For spray-foam, it is important that the application be finished off neatly to avoid problems with the drywall installation.
Masonry walls should be insulated on the exterior surface.
Design Options
Design Option: Crawlspaces and Slabs
Many building codes presently require installation of crawlspace vents to provide ventilation with outside air, but there is no compelling technical basis for crawlspace ventilation requirements. If the crawlspace is vented, the floor should be insulated and any pipes or ducts in the crawlspace should be insulated as well.
In some climates, pipes in vented crawlspaces must also be wrapped with heat trace wires to avoid frozen pipes. If the crawlspace is not vented, it is crucial that all of the crawlspace ground area be covered with a durable vapor retarder, such as heavy-weight polyethylene film. (This is also a good practice for vented crawlspaces.)
For unvented crawlspaces, the insulation should be placed on the inside wall of the crawlspace instead of under the floor above. The insulation should also extend a few feet over the ground surface inside the crawlspace, lying on top of the durable vapor retarder.
For the unvented arrangement, the air within the crawlspace is actually incorporated as a part of the conditioned space within the house, as if it were a basement.
The Crawlspace Insulation Technology Fact Sheet
gives more details about this design option.
If you choose a slab foundation, be sure to follow the recommendations for insulation installation and moisture control found in the
Slab Insulation Technology Fact Sheet.
Design Option: Advanced Wall Framing
Advanced wall framing techniques can be used that will reduce the energy losses through the walls with little or no additional costs. Details are given in the
Wall Insulation Technology Fact Sheet.
Advanced wall framing techniques can be used that will reduce the energy losses through the walls with little or no additional costs. Details are given in the
Wall Insulation Technology Fact Sheet.
Design Option: Metal Framing
Some new homes are built using metal frames instead of wood. Such frames are not susceptible to insect problems that can damage wood-framed structures. However, when you insulate a metal-framed building, it is important to recognize that much more heat flows through metal studs and joists than through pieces of wood.
Because of this difference, placing insulation just between the wall studs, or just between attic or floor joists, doesn't work as well for metal-framed houses as it does for wood-framed houses. If your walls have metal frames, you will need to place continuous insulative sheathing over the outside of the wall frame, between the metal framing pieces and your exterior siding in addition to insulating the space between the studs.
(Note that this insulative sheathing cannot take the place of plywood or other seismic bracing.) If your attic has metal joists, you may want to place rigid foam insulation between the joists and the ceiling drywall and to cover the attic joists with insulation to the extent possible.
Design Option: Insulating Concrete Forms
Insulating concrete forms can be used to construct walls for new homes. These special concrete walls come in a variety of configurations and can provide additional thermal mass to your home to help reduce the effect of outdoor temperature swings.
Insulating concrete forms can be used to construct walls for new homes. These special concrete walls come in a variety of configurations and can provide additional thermal mass to your home to help reduce the effect of outdoor temperature swings.
Design Option: Massive Walls
The most common house type in this country is the light-construction frame house. Massive walls are less common, and include buildings made from concrete, concrete block, and log. These buildings will use less energy than wood-frame construction in many parts of the country because they can store heat from the daytime sun to provide needed heat at night, or can cool down at night to reduce air-conditioning loads during the day.
Research shows that such massive wall systems perform best if the insulation is located on the outside of the wall. See the ZipCode Calculator or the ZipCode table to find out how much insulation you should use.
Design Option: Structural Insulated Panels
Structural insulated panels can be used to construct a house. These panels sandwich plastic foam insulation between two layers of a wood or composite product, thus eliminating the need for structural wood framing members. These systems save energy in two ways, first by reducing the heat losses that would have gone through the wood frame, and second by reducing air leaks.
Both of these changes represent significant energy savings. Just stopping the energy flowing through the wall framing could save 25% of the wall's energy losses.
Design Option: External Insulation Finish System
Some homes are built with an External Insulation Finish System that gives a stucco-like appearance. In the past, there were quality control problems where poor construction led to water leaks into the wall system, usually around window frames. Newer versions of the external insulation finish system have been designed to be more robust and to allow any water entering through a construction defect to drain harmlessly out of the wall.
This system can be used to finish wood-framed, metal-framed, and masonry walls. It offers special advantages for the metal-framed and masonry walls because the continuous external insulation layer optimizes the thermal performance of both of those two wall systems.
Design Option: Attic Ventilation or a Cathedralized Attic
It is important that the house design, and construction, minimize the transfer of moisture from the living space to the attic. To handle any moisture that does migrate into the attic, traditional attic design calls for ventilation. Attics may be ventilated with a combination of soffit vents at eaves and continuous ridge vents. Attic vents may also be installed in gable faces. Many codes and standards require one square foot of unobstructed ventilation opening for each 300 square feet of attic floor area if a vapor retarder is included in the ceiling separating the attic from the living space.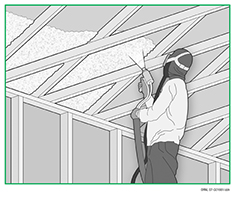
Twice as much ventilation is recommended if there is no vapor retarder. The net free area of a vent is smaller than its overall dimension because part of the vent opening is blocked by meshes or louvers. The openings should be equally distributed between the soffit and ridge vents or between each gable face. Never cover or block vents with insulation. Use baffles to prevent loose-fill insulation from clogging vents.
During the house design phase, you can choose a cathedralized attic, which is not ventilated, unless attic ventilation is required by code in your area.
In a cathedralized attic, the insulation is placed on the underside of the roof instead of on the attic floor. (Think of a room with a cathedral ceiling, only this room is the attic and the ceiling is unfinished.) For this arrangement, the attic space is incorporated as a part of the conditioned space within the house. One advantage of this approach is that the attic will retain any energy lost by ductwork in the attic. Up to 25% of your heating and cooling energy can be wasted by leaky ductwork in a traditional attic.
A disadvantage of an unventilated attic is that the underside of the roof has a greater area than the attic floor. This greater area, and the downward-facing geometry, cause this option to be more costly than insulating the attic floor, so that usually the installed insulation R-value is less. The lower R-value and the greater area mean that more heat is lost through the cathedralized attic roof than would have been lost through the traditional attic floor.
Also, a ventilated attic can reduce summer air-conditioning loads relative to the cathedralized attic. The home owner must balance these two effects, reduced duct energy losses versus increased heating and cooling loads. Of course another option is to ventilate the attic, but locate the ductwork elsewhere within the conditioned part of the house, such as between floors in a multi-story building.
Adding Insulation to an Existing House (Smart Approaches)
Does your home need more insulation? Unless your home was constructed with special attention to energy efficiency, adding insulation will probably reduce your utility bills. Much of the existing housing stock in the United States was not insulated to the levels used today.
Older homes are likely to use more energy than newer homes, leading to higher heating and air-conditioning bills.
Older homes are likely to use more energy than newer homes, leading to higher heating and air-conditioning bills.
Where and How Much
Adding more insulation where you already have some, such as in an attic, will save energy. You can save even greater amounts of energy if you install insulation into places in your home that have never been insulated. Figure 1 shows which building spaces should be insulated.
These might include an uninsulated floor over a garage or crawlspace, or a wall that separates a room from the attic. Figure 3 can give you general guidance regarding the appropriate amount of insulation you should add to your home, and the rest of this page will provide more specific information.
A qualified home energy auditor will include an insulation check as a routine part of an energy audit. For information about home energy audits, call your local utility company. State energy offices are another valuable resource for information.
An energy audit of your house will identify the amount of insulation you have and need, and will likely recommend other improvements as well. If you don't have someone inspect your home, you'll need to find out how much insulation you already have.
How Much Insulation Do I Already Have?
Look into your attic. We start with the attic because it is usually easy to add insulation to an attic. This table will help you figure out what kind of insulation you have and what its R-value is.
Look into your walls. You are planning to add new siding to your house or you plan to finish unfinished space (like a basement or bonus room).
If so, you need to know whether the exterior walls are already insulated or not. One method is to use an electrical outlet on the wall, but first be sure to turn off the power to the outlet. Then remove the cover plate and shine a flashlight into the crack around the outlet box.
You should be able to see whether or not insulation is in the wall. Also, you should check separate outlets on the first and second floor, and in old and new parts of the house, because wall insulation in one wall doesn't necessarily mean that it's everywhere in the house. An alternative to checking through electrical outlets is to remove and then replace a small section of the exterior siding.
Look under your floors. Look at the underside of any floor over an unheated space like a garage, basement, or crawlspace. Inspect and measure the thickness of any insulation you find there. It will most likely be a fiberglass batt, so multiply the thickness in inches by 3.2 to find out the R-value (or the R-value might be visible on a product label). If the insulation is a foam board or sprayed-on foam, use any visible label information or multiply the thickness in inches by 5 to estimate the R-value.
Look at your ductwork. Don't overlook another area in your home where energy can be saved - the ductwork of the heating and air- conditioning system. If the ducts of your heating or air-conditioning system run through unheated or uncooled spaces in your home, such as attic or crawlspaces, then the ducts should be insulated. First check the ductwork for air leaks. Repair leaking joints first with mechanical fasteners, then seal any remaining leaks with water-soluble mastic and embedded fiber glass mesh.
Never use gray cloth duct tape because it degrades, cracks, and loses its bond with age. If a joint has to be accessible for future maintenance, use pressure- or heat-sensitive aluminum foil tape. Then wrap the ducts with duct wrap insulation of R-6 with a vapor retarder facing on the outer side. All joints where sections of insulation meet should have overlapped facings and be tightly sealed with fiber glass tape; but avoid compressing the insulation, thus reducing its thickness and R-value.
Return air ducts are often located inside the heated portion of the house where they don't need to be insulated, but they should still be sealed off from air passageways that connect to unheated areas. Drywall- to-ductwork connections should be inspected because they are often poor (or nonexistent) and lead to unwanted air flows through wall cavities. If the return air ducts are located in an unconditioned part of the building, they should be insulated.
Look at your pipes. If water pipes run through unheated or uncooled spaces in your home, such as attic or crawlspaces, then the pipes should be insulated.
Air Sealing
Air sealing is important, not only because drafts are uncomfortable, but also because air leaks carry both moisture and energy, usually in the direction you don't want. For example, air leaks can carry hot humid outdoor air into your house in the summer, or can carry warm moist air from a bathroom into the attic in the winter.
Most homeowners are aware that air leaks into and out of their houses through small openings around doors and window frames and through fireplaces and chimneys. Air also enters the living space from other unheated parts of the house, such as attics, basements, or crawlspaces. The air travels through:
- any openings or cracks where two walls meet, where the wall meets the ceiling, or near interior door frames;
- gaps around electrical outlets, switch boxes, and recessed fixtures;
- gaps behind recessed cabinets, and furred or false ceilings such as kitchen or bathroom soffits;
- gaps around attic access hatches and pull-down stairs;
- behind bath tubs and shower stall units;
- through floor cavities of finished attics adjacent to unconditioned attic spaces;
- utiltity chaseways for ducts, etc., and
- plumbing and electrical wiring penetrations.
These leaks between the living space and other parts of the house are often much greater than the obvious leaks around windows and doors. Since many of these leakage paths are driven by the tendency for warm air to rise and cool air to fall, the attic is often the best place to stop them.
It's important to stop these leaks before adding attic insulation because the insulation may hide them and make them less accessible.
Usually, the attic insulation itself will not stop these leaks and you won't save as much as you expect because of the air flowing through or around the insulation.
It's important to stop these leaks before adding attic insulation because the insulation may hide them and make them less accessible.
Usually, the attic insulation itself will not stop these leaks and you won't save as much as you expect because of the air flowing through or around the insulation.
Moisture Control and Ventilation
We talk about moisture control in an insulation fact sheet because wet insulation doesn't work well. Also, insulation is an important part of your building envelope system, and all parts of that system must work together to keep moisture from causing damage to the structure or being health hazards to the occupants. For example, mold and mildew grow in moist areas, causing allergic reactions and damaging buildings.
When Is Moisture a Problem?
When moist air touches a cold surface, some of the moisture may leave the air and condense, or become liquid. If moisture condenses inside a wall, or in your attic, you will not be able to see the water, but it can cause a number of problems. Adding insulation can either cause or cure a moisture problem. When you insulate a wall, you change the temperature inside the wall. That can mean that a surface inside the wall, such as the sheathing behind your siding, will be much colder in the winter than it was before you insulated.
This cold surface could become a place where water vapor traveling through the wall condenses and leads to trouble. The same thing can happen within your attic or under your house. On the other hand, the new temperature profile could prevent condensation and help keep your walls or attic drier than they would have been.
Insulation Installation, the Retrofit Challenges
Whether you install the insulation yourself or have it done by a contractor, it is a good idea to educate yourself about proper installation methods because an improper installation can reduce your energy savings.
Also, if your house is very old, you may want to have an electrician check to see if:
Also, if your house is very old, you may want to have an electrician check to see if:
- the electrical insulation on your wiring is degraded,
- the wires are overloaded, or
- knob and tube wiring was used (often found in homes built before 1940).
If any of these wiring situations exists in your house, it may be hazardous to add thermal insulation within a closed cavity around the wires because that could cause the wires to overheat. THIS IS FOR FIRE SAFETY. The National Electric Code forbids the installation of loose, rolled, or foam-in-place insulation around knob and tube wiring.
Adding thermal insulation to the ceiling or walls of a mobile home is complex and usually requires installation by specialists.
If adding insulation over existing insulation, do NOT use a vapor barrier between the two layers!
Adding thermal insulation to the ceiling or walls of a mobile home is complex and usually requires installation by specialists.
If adding insulation over existing insulation, do NOT use a vapor barrier between the two layers!
Attics
On unfinished attic floors, work from the perimeter toward the attic door. Be careful about where you step in the attic. Walk only on the joists so that you won't fall through the drywall ceiling. You may need to place walking boards across the tops of the joists to make the job easier. Remember that it is important to seal up air leaks between your living space and the attic before adding insulation in your attic.
Installing batts and rolls in attics is fairly easy, but doing it right is very important. Use unfaced batts, especially if reinsulating over existing insulation. If there is not any insulation in your attic, fit the insulation between the joists. If the existing insulation is near or above the top of the joists, it is a good idea to place the new batts perpendicular to the old ones because that will help to cover the tops of the joists themselves and reduce thermal bridging through the frame. Also, be sure to insulate the trap or access door. Although the area of the door is small, an uninsulated attic door will reduce energy savings substantially.
In some houses, it is easier to get complete coverage of the attic floor with blown-in loose-fill insulation. It is best to hire an insulation contractor for this job. Loose-fill insulation must be prevented from shifting into vents or from contacting heat-producing equipment (such as recessed lighting fixtures). Block off those areas with baffles or retainers to hold the loose-fill insulation in place.
When you stack new insulation on top of existing attic insulation, the existing insulation is compressed a small amount. This will slightly decrease the R-value of the existing insulation. This effect is most important if the new insulation is more dense than the old insulation. You can compensate for this stacking effect and achieve the desired total R-value by adding about one extra inch of insulation if the old insulation is fiber glass, or about 1/2 inch if the old insulation is rock wool or cellulose.
Reflective Systems are installed in a manner similar to placing batts and blankets. Proper installation is very important if the insulation is to be effective. Study and follow the manufacturer's instructions. Often, reflective insulation materials have flanges that are to be stapled to joists. Since reflective foil will conduct electricity, avoid making contact with any bare electrical wiring.
Radiant barriers may be installed in attics in several configurations. The radiant barrier is most often attached near the roof, to the bottom surface of the attic truss chords or to the rafter framing. Do not lay a radiant barrier on top of your insulation or on the attic floor because it will soon be covered with dust and will not work. A separate DOE fact sheet is available for radiant barriers to show which parts of the country are most likely to benefit from this type of system.
If your attic has NO insulation, you may decide to insulate the underside of the roof instead of the attic floor. (This option is more often used in new houses and is described in Design Option: ATTIC VENTILATION OR A CATHEDRALIZED ATTIC). If you choose the cathedralized attic approach, all attic vents must be sealed. Spray-foam is then often used to insulate the underside of the roof sheathing. If batts are used for this purpose, they must be secured in a manner similar to that described below for insulating under floors. It is best to hire an insulation contractor with experience in this type of installation for this job.
Walls
Installing insulation in the cavity of exterior walls is difficult. However, when new siding is to be installed, it is a good idea to consider adding thermal insulation under the new siding. The Retrofit Best Practices Guide provides useful information about adding insulation when you remodel the outside of your house. It usually requires the services of a contractor who has special equipment for blowing loose-fill insulation into the cavity through small holes cut through the sidewall, which later are closed.
It is sometimes feasible to install rigid insulation on the outdoor side of masonry sidewalls such as concrete block or poured concrete. However, if that is not an option, you can use rigid insulation boards or batts to insulate the interior of masonry walls. To install boards, wood furring strips should be fastened to the wall first. These strips provide a nailing base for attaching interior finishes over the insulation. Fire safety codes require that a gypsum board finish, at least 1/2 inch thick, be placed over plastic foam insulation. The gypsum board must be attached to the wood furring strips or underlying masonry using nails or screws.
The first-floor band joist may be accessible from the basement or crawlspace. Make sure it is properly insulated as shown in Figure 1. More detailed drawings and insulation techniques for the band joist are shown in the Wall Insulation Technology Fact Sheet above.
Basement Walls
When using batt or rigid insulation to insulate the inside of concrete basement walls, it is necessary to attach wood furring strips to the walls by nailing or bonding, or to build an interior stud-wall assembly on which the interior finish can be attached after the insulation is installed. The cavity created by the added framing should be thick enough for the desired insulation R-value.
The kraft paper or standard foil vapor retarder facings on many blanket insulation products must be covered with gypsum or interior paneling because of fire considerations. Some blanket products are available without these facings or with a special flame resistant facing (labeled FS25 - or flame spread index 25) for places where the facing would not be covered. Sometimes the flame-resistant cover can be purchased separately from the insulation. Also, there are special fiber glass blanket products available for basement walls that require less framing and can be left exposed. These blankets have a flame-resistant facing and are labeled to show that they comply with ASTM C 665, Type II, Class A.
Floors and Crawl Spaces
If you have a floor over a crawlspace, you can EITHER: Insulate the underside of the floor and ventilate the crawlspace, OR Leave the floor uninsulated and insulate the walls of an unventilated crawlspace.
When batts or rolls are used on the underside of a floor above an unheated crawlspace or basement, fit the insulation between the beams or joists and push it up against the floor overhead as securely as possible without excessive compaction of the insulation. The insulation can be held in place, either by tacking chicken wire (poultry netting) to the edges of the joist, or with snap-in wire holders. Batts and rolls must be cut and fit around cross-bracing between floor joists or any other obstructions. Strips of insulation may be cut off and stuffed into tight spaces by hand. Don't forget to place insulation against the perimeter that rests on the sill plate. If you insulate above an unheated crawlspace or basement, you will also need to insulate any ducts or pipes running through this space. Otherwise, pipes could freeze and burst during cold weather.
Reflective Systems are installed in a manner similar to placing batts. Proper installation is very important if the insulation is to be effective. Study and follow the manufacturer's instructions. Often, reflective insulation materials have flanges that are to be stapled to floor joists. Since reflective foil will conduct electricity, one must avoid making contact with any bare electrical wiring.
Spray-foam can be used to insulate the underside of a floor. The spray foam can do a good job of filling in the space around wires and other obstructions and in filling any oddly-shaped areas. It is best to hire an insulation contractor with experience in this type of installation.
When a fiberglass blanket is used to insulate the walls of an unventilated crawlspace, it is sometimes necessary to attach wood furring strips to the walls by nailing or bonding. The insulation can then be stapled or tacked into place. Alternatively, the insulation can be fastened to the sill plate and draped down the wall. You should continue the insulation over the floor of the crawl space for about two feet on top of the required ground vapor retarder. Because the insulation will be exposed, be sure to use either an unfaced product or one with the appropriate flame spread rating. When rigid foam insulation boards are used to insulate the walls of an unventilated crawlspace, they can be bonded to the wall using recommended adhesives. Because the insulation will be exposed, be sure to check the local fire codes and the flame-spread rating of the insulation product. If you live in an area prone to termite damage, check with a pest control professional to see if you need to provide for termite inspections.
Reference Sources Used
U.S. Department of Energy
Energy Efficiency and Renewable Energy Program Office Home Page
http://www.eere.energy.gov
A Consumer's Guide to Energy Efficiency and Renewable Energy in the Home
http://www.eere.energy.gov/consumer/your_home/
Tips for Energy Savers
http://www1.eere.energy.gov/consumer/tips/
Insulation Contractors Association of America (ICAA)
Phone: 703-739-0356
http://www.insulate.org/
National Association of Home Builders (NAHB)
1201 15th Street NW
Washington, DC 20005
Phone: 202-266-8200 x0, 800-368-5242, Fax: 202-266-8400
http://www.nahb.org/
NAHB Research Center, Inc.
400 Prince Georges Boulevard
Upper Marlboro, MD 20774
Phone: 800-638-8556
http://www.nahbrc.com
National Institute of Building Sciences
1090 Vermont Avenue, NW, Suite 700
Washington, DC 20005-4905
Phone: 202-289-7800, Fax: 202-289-1092
http://www.nibs.org/
Other Publications
U.S. Department of Energy
Energy Efficiency and Renewable Energy Information Center
http://www1.eere.energy.gov/informationcenter/
Office of Scientific and Technical Information (OSTI)
P.O. Box 62
Oak Ridge, TN 37831
Phone: 865-576-1188, Fax: 865-576-2865
http://www.osti.gov/
Retrofit Best Practices Guide,ORNL/TM-2003/286
Radiant Barrier Fact Sheet, DOE/CE-0335P
Builder's Foundation Handbook, ORNL/CON-295
Moisture Control Handbook, ORNL/SUB--89--SD350/1
Supporting Documentation for the 1997 Revision to the DOE Insulation Fact Sheet, ORNL-6907
U.S. Department of Housing and Urban Development
Washington, DC 20410-6000
Energy Efficient Rehab Advisor
Guidelines for New Home Construction
Building Standards and Guidelines Program (BSGP)
http://www.energycodes.gov
Other Building Code Links
http://www.energycodes.gov/links.stm#code
ASHRAE STANDARD 90.2-2007 Energy-Efficient Design of New Low-Rise Residential Buildings
American Society of Heating, Refrigerating and Air-Conditioning Engineers, Inc.
1791 Tullie Circle, NE
Atlanta, GA 30329
http://www.ashrae.org
Thermal Design Guide for Exterior Walls
American Iron and Steel Institute
http://www.toolbase.org/PDF/DesignGuides/ThermalDesignGuide.pdf
Manufacturer's Associations
Air Diffusion Council (ADC) (representing manufacturers of flexible air duct)
1901 N. Roselle Road, Suite 800
Chicago, Illinois 60195
Phone: 847-706-6750, Fax: 847-706-6751
http://www.flexibleduct.org/
American Iron and Steel Institute
1140 Connecticut Ave., NW, Suite 705
Washington, D.C. 20036
Phone: 202-452-7100
http://www.steel.org/
Cellulose Insulation Manufacturers Association (CIMA)
136 South Keowee Street
Dayton, OH 45402
Phone: 888-881-CIMA (881-2462) or 937-222-CIMA (222-2462), Fax: 937-222-5794
http://www.cellulose.org/
Center for the Polyurethanes Industry
American Chemistry Council
1300 Wilson Blvd., Arlington, VA 22209
http://www.polyurethane.org
Expanded Polystyrene (EPS) Molder's Association
1298 Cronson Boulevard, Suite 201
Crofton, MD 21114
Phone: 800-607-3772
http://www.epsmolders.org
Extruded Polystyrene Foam Association (XPSA)
4223 Dale Boulevard
Woodbridge, VA 22193
Phone: 703-730-0062, Fax: 703-583-5860
http://www.xpsa.com
Home Ventilating Institute
1000 N. Rand Rd., Suite 214
Wauconda, IL 60084
Phone: 847-526-2010, Fax: 847-526-3993
http://www.hvi.org/
Insulating Concrete Form Association
1730 Dewes Street, Suite #2
Glenview, IL 60025
Phone: 888-864-4232, Fax: 847-657-9728
http://www.forms.org/
North American Insulation Manufacturers Association (NAIMA)
44 Canal Center Plaza, Suite 310
Alexandria, VA 22314
Phone: 703-684-0084, Fax: 703-684-0427
http://www.naima.org
Polyisocyanurate Insulation Manufacturers Association (PIMA)
7315 Wisconsin Avenue, Suite 400E
Washington, DC 20814
Phone: 301-654-0000, Fax: 301-951-8401
http://www.pima.org
Reflective Insulation Manufacturers Association
4519 E. Lone Cactus Drive
Chicago, AZ 85050
Phone: 800-279-4123, Fax: 480-513-4749
http://www.rima.net/
Society of the Plastics Industry, Inc.
1667 K St., NW, Suite 1000
Washington, DC 20006
Phone: 202-974-5200, Fax: 202-296-7005
http://www.socplas.org
Spray Polyurethane Foam Alliance
4400 Fair Lakes Court, Suite 105
Fairfax, VA 22033
Phone: 800-523-5154, Fax: 703-222-5816
http://www.sprayfoam.com/
Structural Insulated Panel Association (SIPA)
P.O. Box 1699
Gig Harbor, WA 98335
Phone: 253-858-7472, Fax: 253-858-0272
http://www.sips.org
U.S. Department of Energy
Energy Efficiency and Renewable Energy Program Office Home Page
http://www.eere.energy.gov
A Consumer's Guide to Energy Efficiency and Renewable Energy in the Home
http://www.eere.energy.gov/consumer/your_home/
Tips for Energy Savers
http://www1.eere.energy.gov/consumer/tips/
Insulation Contractors Association of America (ICAA)
Phone: 703-739-0356
http://www.insulate.org/
National Association of Home Builders (NAHB)
1201 15th Street NW
Washington, DC 20005
Phone: 202-266-8200 x0, 800-368-5242, Fax: 202-266-8400
http://www.nahb.org/
NAHB Research Center, Inc.
400 Prince Georges Boulevard
Upper Marlboro, MD 20774
Phone: 800-638-8556
http://www.nahbrc.com
National Institute of Building Sciences
1090 Vermont Avenue, NW, Suite 700
Washington, DC 20005-4905
Phone: 202-289-7800, Fax: 202-289-1092
http://www.nibs.org/
Other Publications
U.S. Department of Energy
Energy Efficiency and Renewable Energy Information Center
http://www1.eere.energy.gov/informationcenter/
Office of Scientific and Technical Information (OSTI)
P.O. Box 62
Oak Ridge, TN 37831
Phone: 865-576-1188, Fax: 865-576-2865
http://www.osti.gov/
Retrofit Best Practices Guide,ORNL/TM-2003/286
Radiant Barrier Fact Sheet, DOE/CE-0335P
Builder's Foundation Handbook, ORNL/CON-295
Moisture Control Handbook, ORNL/SUB--89--SD350/1
Supporting Documentation for the 1997 Revision to the DOE Insulation Fact Sheet, ORNL-6907
U.S. Department of Housing and Urban Development
Washington, DC 20410-6000
Energy Efficient Rehab Advisor
Guidelines for New Home Construction
Building Standards and Guidelines Program (BSGP)
http://www.energycodes.gov
Other Building Code Links
http://www.energycodes.gov/links.stm#code
ASHRAE STANDARD 90.2-2007 Energy-Efficient Design of New Low-Rise Residential Buildings
American Society of Heating, Refrigerating and Air-Conditioning Engineers, Inc.
1791 Tullie Circle, NE
Atlanta, GA 30329
http://www.ashrae.org
Thermal Design Guide for Exterior Walls
American Iron and Steel Institute
http://www.toolbase.org/PDF/DesignGuides/ThermalDesignGuide.pdf
Manufacturer's Associations
Air Diffusion Council (ADC) (representing manufacturers of flexible air duct)
1901 N. Roselle Road, Suite 800
Chicago, Illinois 60195
Phone: 847-706-6750, Fax: 847-706-6751
http://www.flexibleduct.org/
American Iron and Steel Institute
1140 Connecticut Ave., NW, Suite 705
Washington, D.C. 20036
Phone: 202-452-7100
http://www.steel.org/
Cellulose Insulation Manufacturers Association (CIMA)
136 South Keowee Street
Dayton, OH 45402
Phone: 888-881-CIMA (881-2462) or 937-222-CIMA (222-2462), Fax: 937-222-5794
http://www.cellulose.org/
Center for the Polyurethanes Industry
American Chemistry Council
1300 Wilson Blvd., Arlington, VA 22209
http://www.polyurethane.org
Expanded Polystyrene (EPS) Molder's Association
1298 Cronson Boulevard, Suite 201
Crofton, MD 21114
Phone: 800-607-3772
http://www.epsmolders.org
Extruded Polystyrene Foam Association (XPSA)
4223 Dale Boulevard
Woodbridge, VA 22193
Phone: 703-730-0062, Fax: 703-583-5860
http://www.xpsa.com
Home Ventilating Institute
1000 N. Rand Rd., Suite 214
Wauconda, IL 60084
Phone: 847-526-2010, Fax: 847-526-3993
http://www.hvi.org/
Insulating Concrete Form Association
1730 Dewes Street, Suite #2
Glenview, IL 60025
Phone: 888-864-4232, Fax: 847-657-9728
http://www.forms.org/
North American Insulation Manufacturers Association (NAIMA)
44 Canal Center Plaza, Suite 310
Alexandria, VA 22314
Phone: 703-684-0084, Fax: 703-684-0427
http://www.naima.org
Polyisocyanurate Insulation Manufacturers Association (PIMA)
7315 Wisconsin Avenue, Suite 400E
Washington, DC 20814
Phone: 301-654-0000, Fax: 301-951-8401
http://www.pima.org
Reflective Insulation Manufacturers Association
4519 E. Lone Cactus Drive
Chicago, AZ 85050
Phone: 800-279-4123, Fax: 480-513-4749
http://www.rima.net/
Society of the Plastics Industry, Inc.
1667 K St., NW, Suite 1000
Washington, DC 20006
Phone: 202-974-5200, Fax: 202-296-7005
http://www.socplas.org
Spray Polyurethane Foam Alliance
4400 Fair Lakes Court, Suite 105
Fairfax, VA 22033
Phone: 800-523-5154, Fax: 703-222-5816
http://www.sprayfoam.com/
Structural Insulated Panel Association (SIPA)
P.O. Box 1699
Gig Harbor, WA 98335
Phone: 253-858-7472, Fax: 253-858-0272
http://www.sips.org